Having recently worked through the issues of slaving a Pulsar dome to a telescope and helping someone else through the same process I thought it would be useful to document the setup here. I have an Avalon Linear Fast Reverse mount but from a software point of view this is identical to an EQ6 and I use Maxim DL for image capture, CCD Commander for automation and Cartes Du Ciel as a planetarium. With a few peculiarities, the setup is applicable to other programs that you may be using.
The first step is to run the Shelyak Test_DomeTracker.exe program. This is supplied on the CD and you’ll need to run ‘Do Calibration’ several times. What you’re looking for is that the number of steps per rotation remains very similar from run to run. Any large differences here means that mechanical problems are causing you to lose steps. This must be rectified before continuing. Make a note of the number of steps per rev and acc/decc steps obtained.
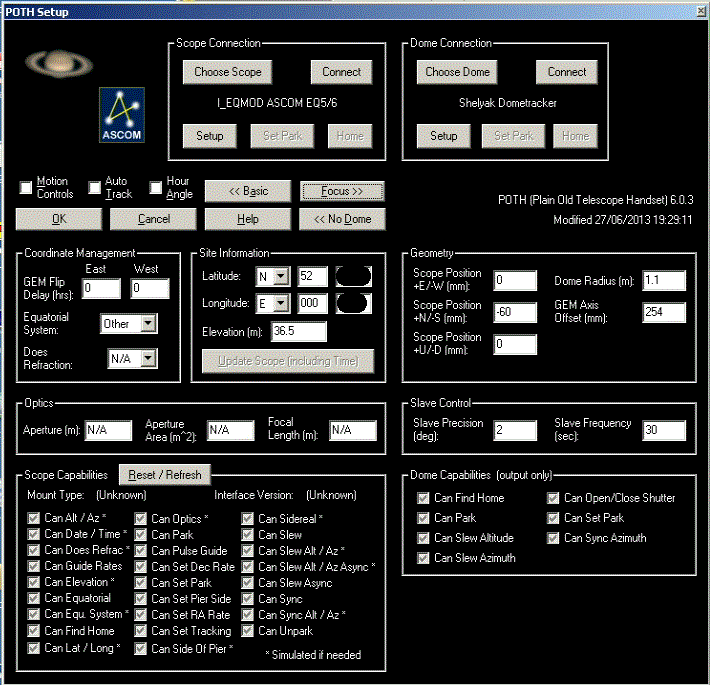
Next up we need to run POTH which is available in Scope-Dome hubs under the Ascom Platform 6 program group. We need POTH because we can only connect one program to the Shelyak ASCOM driver. With POTH, we connect it to the dome driver and then connect our other programs to POTH. There’s a fair amount of information to add to the dome setup screen and it will require some careful measurements of your mount and pier and it’s position within your dome. Within POTH, click Setup. If dome data isn’t displayed then press Dome>> to expand the screen.
Click ‘Choose Dome’, select the Shelyak ASCOM dome driver and click Properties.
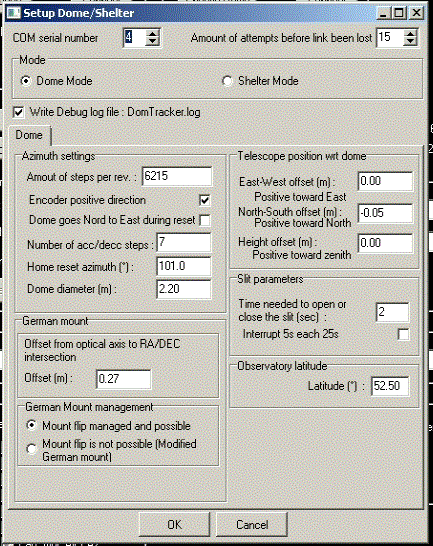
 Enter your COM serial number, then look at the Dome Azimuth settings. Enter the values you obtained from your calibration runs, your best guess for the home azimuth position and the dome diameter (in metres). Now we need some measurements from your dome and mount so a tape measure will be required.
All measurements are made from an imaginary point at the intersection of RA and DEC axis on your mount. This will be inside the body but make an estimate of it’s position. From this point make the following measurements:
- Any East-West offset referenced to the dome. Usually this is zero but check to make sure
- Any North-South offset, again referenced to the dome. If there’s any offset, it will usually be to the south so this will be entered as a negative number
- The height of the intersection above or below the base of the dome hemisphere
All these measurements are made in metres and are entered in the relevant dialog boxes under ‘Telescope position wrt dome’.
You’ll need one more measurement; the distance between the intersection and the optical axis of your telescope. Don’t forget that a top mounted guide scope will significantly increase this distance. This is entered as the German mount offset and you’ll also have to set the mount management here as per the illustration above. Click the OK button
Once all this information is entered you’re most of the way there. Now we check the home position azimuth that you entered.
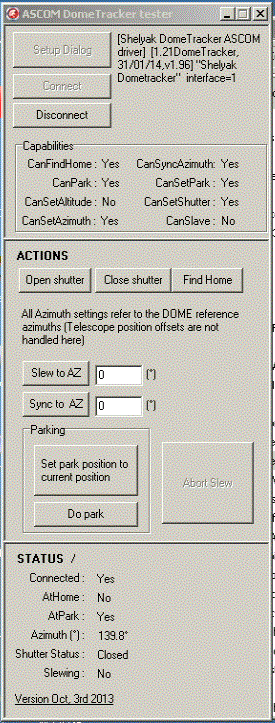
Start the test_ASCOM_DomeTracker.exe program from the CD, check the Setup dialog to ensure the information you entered is all correct and then Connect.
Park the mount so it’s pointing due north and using the Actions buttons in the program ‘Find Home’. The dome should move to it’s home position with the silver tape in front of the sensor. Next Slew to AZ 0 degrees and the dome slit should end up directly in front of the telescope. Failure at this point indicates that either your tick count or home position is incorrect. As you’ve carefully made multiple calibration runs earlier we’ll assume it’s the home position. Using the setup dialog, make an adjustment to the home azimuth setting and re-home the dome. Slew to AZ zero again and compare the dome position to the previous position. Repeat this process until the dome slit stops reliably in front of the telescope when slewed.
It’s worth stressing here that you must get the previous stage setup and working reliably before moving on. The dome must reliably move from the Home position to North otherwise what follows will be an exercise in frustration.
With all this done the dome should be set and it’s time to bring the mount into play. Once again, like the dome, we will connect POTH to the ASCOM mount driver and then connect other programs to POTH. The reason for this is that POTH will intercept mount moves for us and command the dome to move as well to follow the telescope pointing. Using the POTH setup screen choose the EQ6 driver, setup and then connect. The screen should look similar to this:
Note that you need to enter your mount/dome measurements again in the Geometry section. Pay attention here as this time the dome radius is required in metres and all other measurements are in millimetres.
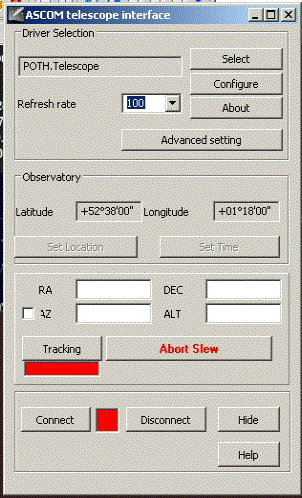
In your planetarium program (for this example we’ll be using Cartes Du Ciel) open the telescope dialog and select the POTH.Telescope driver.
 Once you’ve pressed the Connect button, slews initiated within the planetarium will move both the telescope and the dome in sync.
In Part 2 I’ll look at connecting Maxim.


One reply on “Setting up a Pulsar dome”
[…] part 1 we looked at getting a Pulsar dome to follow movements of the telescope when slewing from within […]